
Garage Door Bottom Seal Replacement
That strip of rubber or vinyl along the bottom of your door is the only thing between your garage floor and everything outside of it. You know it indoors first when a garage door bottom seal hardens, splits or flattens under its own weight. A thin line of daylight under a closed door, rainwater tracking across the slab, leaves and grit piling up inside, insects and rodents finding an easy way in. Century Garage Door Service performs garage door seal replacement on residential and light commercial doors. Worn bottom seals, damaged retainers and the weather stripping around the rest of the opening. Call us at 833-435-4540 and let us know what you find at your door.
- New garage door bottom seal to match your door and retainer – T style, bulb, beaded or J type
- Bent, rusted or torn-out retainer channel replaced outright, not patched around
- Garage door threshold seal for sloped or uneven concrete that a bottom seal alone can never close
Request garage door bottom seal replacement. If you know the width and brand of your door, please have them available – it helps us to bring the right seal profile.
Request an Estimate
We’ll get back to you within 15 minutes.
Who Actually Comes to Your Door
Most of the phone numbers you see for garage door seals are lead brokers not garage door companies. You give a problem to a call center, and your info gets sold to whichever contractor is bidding the highest that hour, and a stranger shows up with no record of the conversation you had. The work is being done by Century Garage Door Service. When you call 833-435-4540, you’re talking to the people who will be in your driveway. And the notes from that call go with the job.
Here is how the process runs. We ask you what you see, daylight, water, pests, a seal hanging loose at one corner, and how wide the door is, roughly. Then the technician closes the door all the way and checks the entire bottom edge against the floor: where the gap is, whether it’s the full width or widens at one end, if the retainer is still straight, if the concrete itself has settled. Now before anyone starts pulling seal out of the track, you are told what is actually wrong and what each option costs. If your existing seal has life in it and the real problem is a low spot in the slab, you hear that, not a sales pitch.
The vans have seal and retainer stock, not just tools. This means common bottom seal profiles in the lengths used for most residential doors, aluminum retainer in standard sizes, threshold material, perimeter weather stripping, fasteners and the cutting tools to fit it all on site. We work on LiftMaster, Genie, Chamberlain, Craftsman, Clopay, Amarr, Wayne Dalton and Overhead Door equipment so if you need a Clopay garage door seal, an Overhead Door seal or a replacement on a door with no badge left on it, the profile is matched to the retainer on your door, not forced into it.
What a Failed Seal Looks Like and What a New Seal Looks Like
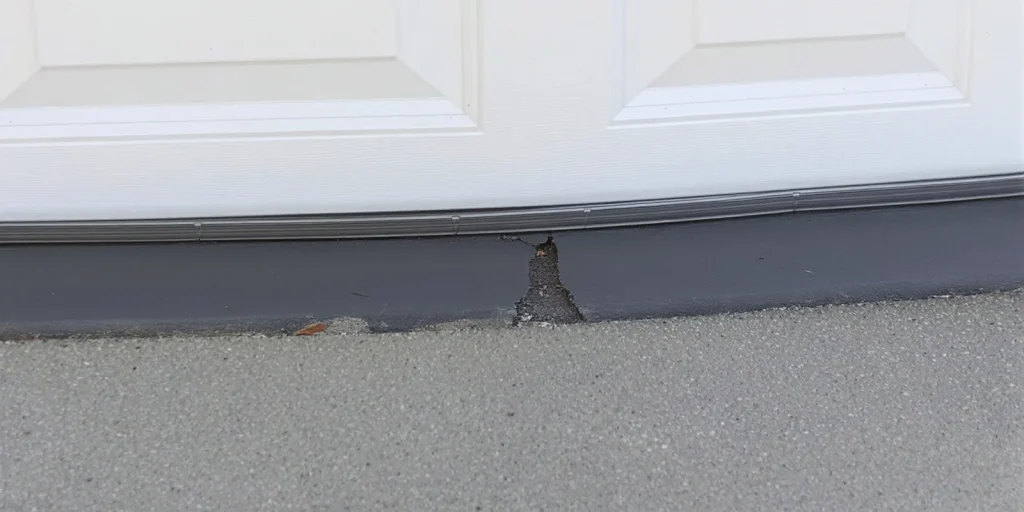
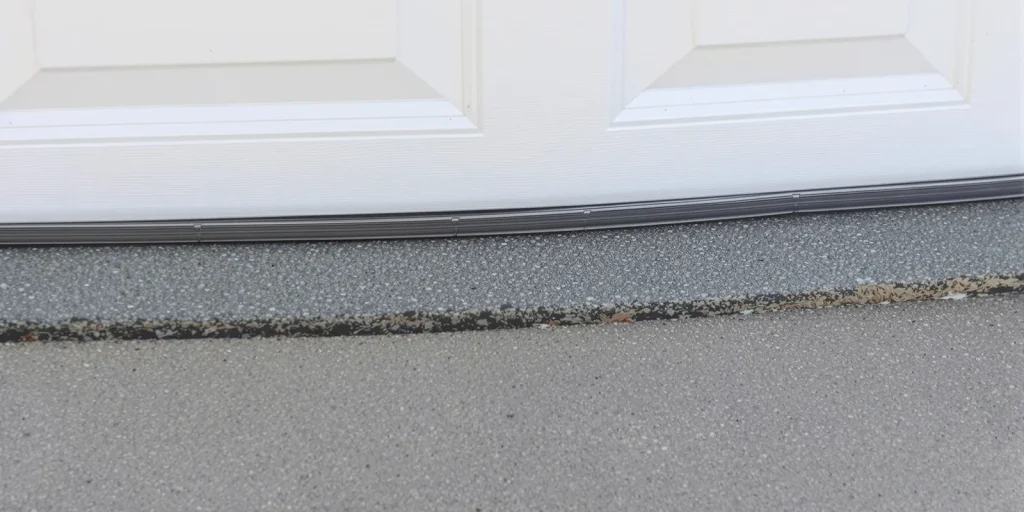
Left: a fifteen-year-old garage door weather seal that has hardened and split along its length, leaving a gap the full width of the opening, visible to the eye. Right: same door after replacing the retainer and fitting a new bottom seal – the bulb compresses against the slab and the light line is gone.
What's the Matter with a Garage Door Seal and How We Fix It
Usually “the seal is bad” is one of four different problems and they aren’t all fixed the same way. Sometimes the rubber is done, but the hardware is fine. Sometimes the seal is good and the channel that holds it has torn loose. Sometimes the door is fine but the floor under it has sunk. Here’s what we see most often, and how we fix each one.
Cracked, Torn or Flattened Garage Door Rubber Seal
This is the normal one. The rubber seal on a garage door is flexible but after years of exposure to UV, heat, road salt and compression, it turns into a stiff, chalky strip that doesn’t bounce back when the door closes. Often it will be torn at one end where a tire or a lawn mower has caught it, or forever flattened into a pancake in the middle. Sometimes it’s called a garage door sweep, sometimes a garage door gasket, but it’s the same part. If your retainer is straight and the ends are intact replacement is easy. You pull the old seal out of the channel, clean the track and drop a new seal in the matching profile. The trick is to fit the profile. A T-type seal won’t sit in a J-type retainer, and a bulb seal in a channel designed for something narrower will pull loose the first cold morning.
The Retainer That Holds the Seal Is Bent, Rusted or Pulling Away
The retainer is the aluminum or vinyl channel that is screwed to the bottom of the door that the seal strip slides into. It takes the abuse the seal doesn’t: backing into the door, water sitting against it, corrosion on a steel door in a coastal climate, screws working loose over a decade of cycles. When a retainer is bent open, the seal walks out sideways. If the retainer is rusted thru or the screw holes have elongated, no new garage door seal strip will hold. We replace the retainer completely, cut to the actual width of the door, re-drill where the metal is good and fit the new seal into it. The single most common cause of a seal replacement failing again within a year is trying to save a failed retainer.
The Concrete Is Uneven and the Door Requires a Garage Door Threshold Seal
If the drive slopes toward the garage or the slab has settled leaving a dip in the middle of the opening, the door can be sealing fine and you will still get water. A bottom seal can only close so much distance and then it is not touching. The fix is a garage threshold seal, a low rubber ramp bonded to the floor across the opening onto which the bottom seal closes. It lifts the sealing line clear of the water, and gives the seal a flat surface to meet. The garage door floor seal prevents wind-driven rain from running back under the door and keeps blown debris on the driveway side. On doors with a real dip we will usually recommend the threshold and the bottom seal together as each one alone leaves a gap.
Garage Door Seal Top and Sides: the Perimeter Weather Stripping
Air and water don’t just come in at the bottom. The garage door seal side pieces and the strip across the header are a separate component — vinyl-flanged stop molding nailed to the jambs and header that the door face closes against. And if that garage door weather stripping gets brittle, curls away from the frame or gets torn off by a snow shovel, you’ll have drafts down both edges of the door no matter how good that bottom seal is. We are already at the door so we check the perimeter while we are there and can do garage door weather stripping replacement on the same visit. If your complaint is drafts not water on the floor, often the bottom is not the real culprit, it is the perimeter.
Replace the Seal or Rebuild the Bottom of the Door?
Once the technician reads the door, there are generally two ways to go. The cheaper one assumes your hardware is good and it’s just the rubber that’s aging. The more involved one addresses the retainer and the floor as well. This is what we recommend when the seal has been replaced once already and fails again. Both are quoted before any work is done.
Bottom Seal Only Replacement
-
If the retainer is straight, the fasteners hold, and the floor is flat, the rubber is just worn out.
-
Old seal removed from retainer channel and channel cleaned of grit, rust and old adhesive
-
A new bottom seal cut to the exact width of your door, in the matching profile, with the ends left long enough to close the corners
-
Retainer checked all over and re-tightened where screws have worked loose
-
Door cycled and checked closed position against floor across full width prior to departure
Full Bottom Rebuild: Seal, Retainer and Threshold
-
For a door where the channel is bent, corroded or torn loose. For a door where the slab has settled and no bottom seal alone will close the gap.
-
Replace bent or rusted-through channel with new aluminum retainer, cut to length and fastened into sound metal
-
Heavy profile garage door bottom weather seal fitted in new retainer, sized for actual gap, not nominal gap
-
Threshold seal bonded across the opening where the concrete is low, sloped or cracked
-
Perimeter weather stripping has been checked on the jambs and header and replaced if it has failed so the entire opening is sealed and not just the bottom edge
How to Replace a Garage Door Bottom Seal
Here’s the deal: This is one of the few garage door jobs a careful homeowner can actually do. Replacing the seal material at the bottom edge of the garage door doesn’t get you anywhere near the stored tension that you would get with springs, cables or an off-track door – as long as you stay away from the bottom brackets at either end of the door, which we will get back to in a moment. If you’re wondering how to install garage door seal yourself, here’s the honest process. If you get to step two and the retainer is destroyed, that’s the time to call somebody.
-
1
Measure the door and find out what you really got.
Measure the width of the whole door and add a few inches so you can trim. Then look at the channel on the bottom edge. If you have two parallel slots, you have a double-track retainer that uses a T-style seal. A rolled lip generally takes a J-type or beaded seal in one slot. A one piece rubber strip, screwed flat to the bottom of a wooden door is a different animal again. Snap a picture of the end of the channel – that’s the photo that will tell the supply house which profile you need.
-
2
Check the retainer before you purchase anything.
Run your hand over the channel. If it is bent open, split, rusted thru or the screws turn easily in their holes, stop here. A new seal in a failed retainer will pull out within a season. The retainer replacement means working along the full bottom edge of the door including near the bottom brackets. This is where most DIY jobs start to intrude into territory we’d rather deal with.
-
3
Be sure the door is fully closed and turn the power off to the opener.
Before you touch anything, the door must be fully down on the floor and the opener unplugged so nobody can send it up while your hands are in the channel. Do not leave the door ajar to improve access. People get hurt working on a door that’s supported by an opener or a spring.
-
4
Pull out the old seal and clean the channel.
Work the old seal free at one end and pull it along the track. Decades-old rubber will often snap; if it does, work in sections. Clean the channel out well because compacted dirt, gravel and rust flakes are the reason the new seal will not feed. The next step is much easier with a squirt of silicone lubricant in the track. Instead of oil based lube, use silicone. Oil will break down rubber.
-
5
Install new seal and check closed position.
Feed the new garage door seal strip in at one end and pull it thru evenly instead of pushing it. With two people, it’s a lot easier. One pulling, one leading. Once it’s thru, trim the ends a little long so the corners stay closed. Plug the opener back in and cycle the door. Then close it and look along the bottom from the inside with the lights off. If you can see daylight anywhere you have either got the wrong profile, an uneven floor or a door that is not sitting level – and each of those has a different fix.
Do not loosen, unbolt or remove the bottom brackets at either end of the door.
They are under the full tension of the lift cables and will give way with sufficient force to cause serious injury or worse. Never, ever, ever touch the torsion spring over the door, the springs on the tracks or the cables down either side. Those things hold hundreds of pounds of energy and it takes tools and training to be able to release them safely. Never work on a door that has jumped its track, is hanging askew or will not stay down under its own weight. Never, never put your hands in the bottom channel when the opener is powered.
If the seal job ends up involving any of the above, put the tools down and call 833-435-4540. This isn't the liability waiver section - it's the part of the job that lands people in the ER.
How to Choose a Company to Replace Your Garage Door Seals
The bottom seal work is small enough that it attracts people who are not really garage door technicians. Sealing is inexpensive, the job looks simple and plenty of general handymen will take it on. The trouble is that a seal is both a symptom and a part. Even if it was fitted perfectly, a door that doesn’t close evenly, is at an angle in its tracks, or has a worn bottom section will destroy a new seal. You won’t see that if all you know is how to thread rubber into a channel and you’ll be buying the same part again next year.
The second thing to look out for is the reverse upsell. The company that quotes you a seal over the phone without seeing the door shows up and finds the retainer destroyed and the price triples right then and there. There’s nothing wrong with a price changing when the diagnosis changes, but quoting a price before anyone has looked is a lot wrong. And ask any company you call if their phone price is a real quote or an estimate pending inspection, and get the answer before they are standing in your garage.
Ask them two questions before you hire them. Are you going to look at the retainer/floor as part of the quote or just replace the rubber? And is the person on the phone working for the company that’s going to be doing the work?
Questions We Are Asked About Garage Door Bottom Seals
How long does a garage door bottom seal last?
Most bottom seals last from five to ten years before they harden enough to stop sealing, although that range varies considerably with climate and exposure. Extreme heat and cold cycles, road salt and standing water, as well as direct sun on the door face all shorten it considerably. In a hot climate, if a door faces south, it may need a new seal in four years; in a mild climate if it is shaded, it can go well beyond twelve. The seal will tell you before the calendar does. When the rubber no longer springs back after the door opens, it’s done.
What are the different types of garage door seals and does it matter which one I get?
It matters, because the seal has to match the retainer that’s already on your door. The most common types of garage door bottom seals include T-style, which has one or two T-shaped ribs that fit into a double-channel retainer; bulb style, featuring a hollow tube that compresses against the floor and is good for uneven surfaces; beaded or J-type, which uses a rounded edge in a single-slot channel; and flat vinyl or rubber strips that are screwed directly to the bottom of older wooden doors. Separate from all of these, garage door bottom weather stripping in the perimeter sense – the vinyl flanged molding on the jambs and header – is a different product altogether and is not interchangeable.
Just put a new seal in and still have a gap. What have I done wrong?
Generally nothing. The three normal causes are a non flat floor, a door not closing square or a seal profile that is too shallow for the gap. If the gap is close to the center of the opening, suspect the slab. If it is at one end only, the door is probably hanging crooked in its tracks or the cables are out of balance. That is a hardware problem not a seal problem. If it runs the full width evenly the seal you fitted is not deep enough for the distance it needs to cover and a taller profile or a threshold seal will seal it.
Can you match the seal on my Clopay, Wayne Dalton or Overhead Door garage door?
Yes. We work on Clopay, Amarr, Wayne Dalton and Overhead Door doors as well as LiftMaster, Genie, Chamberlain and Craftsman openers and we match the seal to the retainer physically on your door rather than by the badge. That’s important because manufacturers change retainer designs from one production year to the next and a door purchased as a Clopay in one decade may take a completely different profile from one purchased a decade later. The only thing that determines which seal fits is the channel on your door.
Will a new bottom seal really keep water and pests out?
A well fitted seal on flat concrete does a good job against wind driven rain, dust, leaves, insects and mice. A bottom seal alone will not suffice against water running downhill toward your garage – moving water will find the low spot and push under. That situation needs a threshold seal, and in extreme cases it needs drainage work outside the door that is beyond what a garage door company does. We look at the door and tell you which of those you are dealing with. We don’t sell you a seal that was never going to solve it.
Stop the Drafts, Water and Pests Under Your Door
A failed bottom seal is a tiny thing that does disproportionate damage – water on the slab, rust on whatever is stored near the door, heating and cooling escaping thru a gap you can see daylight thru and an open invitation to everything living in your yard. Century Garage Door Service will look at the seal, retainer, and floor together and tell you what the door needs with the price agreed before the work begins.
Call 833-435-4540 and tell us what you see under your door: daylight, water, drafts, or pests. We will tell you what causes it.
Other Garage Door Services
Garage Door Weather-Stripping Replacement
Perimeter stop molding on jambs and header, to block drafts coming down sides not under the bottom.
Replacement of Garage Door Panels
Bottom sections that are dented, rotted or bowed that keep destroying seals, replaced instead of patched.
Garage Door Track & Roller Repair
For a door that is crooked in the tracks and seals on one side only.